Navigation

Showing posts with label Tutorial. Show all posts

Wednesday, March 28, 2012

Asli vs. KW/Palsu: Pensil 2B Faber-Castell

Okay.... Sebenernya ini sama sekali ga berhubungan dengan anime, manga, mau pun Jepang. Tapi berhubung ini musim ujian, gw rasa ini penting buat tau caranya bedain pensil yang asli dengan yang KW (PALSU). Lo ga mau kan ga lulus cuma gara-gara pensil lo KW punya?

Bedain pensil KW sama yang asli beda loh dari bedain figurine atau tas branded. Masalahnya, pensil KW ini harganya sama persis dengan yang asli, malah ada yang jual lebih mahal. Penampakannya juga mirip banget. Terus lo mau berdalih kalo pensil KW cuma dijual di tempat abal? Itu juga ga pasti. Pensil KW yang didapet temen sekelas gw ini dia beli dar koperasi SD, tapi ternyata KW dan gw pun merasa prihatin dengan nasib para anak SD di sekolah gw itu.

Okay~~~ Enough talking dan mari melihat bedanya. Btw, kebetulan yang gw temukan ini pensil sejuta umat di Indonesia: Faber-Castell.

Pertama. WARNA KAYUNYA. I repeat, WARNA KAYUNYA. Faber-Castell yang asli warna kayunya agak kemerahan sementara yang KW warnanya krem pucat. Begini nih....


Alasan kenapa yang KW penampakannya buduk demikian akan gw jelaskan nanti. Nah, liat kan bedanya?

Kedua, did you know kalo tulisan di pensil Faber-Castell bukan lagi "FOR COMPUTER"? Yup, sudah berganti jadi "GERMAN LEAD FOR COMPUTER SCANNING". Pensil yang asli jelas pakenya kalimat yang baru, sementara si KW tetep dibubuhkan tag-line lama. Ini beda paling jelas selain warna kayunya.


Ketiga, mulai ke hal yang lebih detail, TULISAN MERK DAN JENIS PENSILNYA. Tulisan di pensil yang asli warnanya keemasan. Yang KW? Emas juga sih, tapi warna emasnya lebih kuning. Liat di sini....


Keempat, WARNA LINGKARAN EMAS DI UJUNG PENSIL. Warna yang asli keliatan solid, catnya ok, dan garisnya rapi. Sementara kalo yang KW, warnanya keliatan pudar, catnya juga gelap, dan garisnya ga rapi.


Kelima, KUALITAS SAAT DISERUT. Ini jelas juga berasa lah. Pensil yang asli gampang diserut karena kualitas kayunya bagus. Grafitnya juga ikut keserut jadi hasilnya gampang runcing. Yang KW bisa bikin lo darah tinggi gara-gara susah diserut (makanya tadi penampakan yang KW buduk). Dalam usaha meruncingkan pensil KW, ya paling berakhir begini sih....

 Dijamin susah karena gampang patah (grafitnya buduk sih). Yah, mungkin ini pensil ga dianjurkan untuk ujian (kecuali lo emang ga mau lulus), tapi kayaknya lumayan untuk melatih kesabaran hati dan jiwa *sigh*

Sekalinya berhasil keserut, ya hasilnya gini deh. Entah bisa dipake ujian apa enggak. Kemungkinan sih ga bisa, pasti susah kan buletin jawaban lo. Tapi hebatnya temen gw bisa, yah dapet nilainya amit-amit sih *plak*

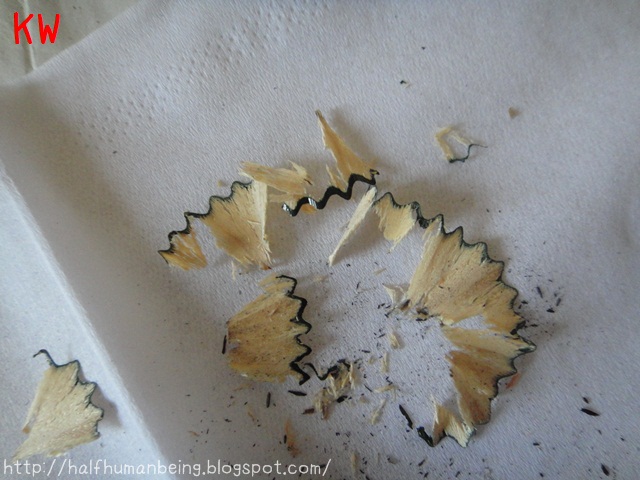
Masih soal runcing meruncing. Hasil serutannya juga beda. Yang KW serpihan dari grafitnya dikit banget (ya iyalah, wong grafitnya jadi runcing juga enggak -_-) sementara yang asli mah serpihan grafitnya banyak.


Nah, yang terakhir, KETAHANAN PENSIL SAAT LO TEKAN. Apalagi yang tenaganya bak setan ngamuk kayak gw, pasti langsung berasa *plak* Yang asli mau lo hajar kayak gimana juga susah buat patah. Yang KW? Yah teken aja dikit, pasti patah. Nih video sebagai buktinya (cuma itungan detik kok, ga lama buffer-nya *promosi* *plak*)

ASLI:


KW:


Sekian tutorial menghindari pensil KW dari gw. Semoga membantu supaya ga ketipu. Saran gw sih ya, beli aja sih di toko buku yang udah terpercaya (Gramedia atau Gunung Agung). Harganya ga mahal-mahal amat kan dibanding harga di pasar, paling cuma beda lima ratus perak. Kalo emang mau beli di pasar, pastiin dulu barangnya asli ye xD

Thursday, December 01, 2011

Nendoroid Repair: Broken Joint (Stuck Join)

Before the tragedy....

Today, I wanna share something about Nendoroid reparation. Actually I just got a little accident with my Nendoroid Miku Support Version. I swapped her face with an expression from Nendoroid Luka (yup, see the picture!). It was so cute at first time but then it turned into a huge nightmare when Luka's joint broke and the part of it were stuck inside Miku's body!

But luckily, I've found a way to fix the problem! That's what I wanna share. My case was a part of joint got stuck deep in another Nendoroid's body. Here's my way to fix it ^^

First, you'll need these equipments!


A hair dryer and a pair of compasses! That's all you need! For girls, you can also use your blackheads cleanser tool (the one shaped like a big needle with circle on the top of it). It has a sharp point which can be as useful as a pair of compasses! And as you see from the picture above, I use the thick needle on the compasses, not the thin one =D

My method is like this in the picture, I'll give more explanation below it ^^


Here's the steps:
  1. First, heat the area around the stuck joint with the hair dryer. Be careful not to melt the Nendoroid while doing that. Don't bring the hair dryer too close with the Nendoroid. 2-3 cm from the are is hot enough =D
  2. Since Nendoroid is made from PVC which is a kind of plastic, it will become slightly softer after you heat it. Turn off the hair dryer when you feel that it's soft enough, once again, be careful not to melt it. Then with the thick part of compasses, make a scratch around the stuck joint and the Nendoroid body. Make it slightly bigger than the original size so the stuck joint can be removed.
  3. If the PVC starts to harden again, heat it again and repeat step 2. Try to dig a little space between the joint and the body.
  4. After there's a little space, insert the thick part of compasses (or your blackheads cleanser is fine) to the little space. Push it softly so it can go a little deep into the space. Make sure that you can move it between the space. The PVC may become hard again so you need to heat it again.
  5. After the PVC is soft enough, slowly and softly, dig the broken joint out of the Nendoroid body. Be careful while doing this because the shape of the body may change.
  6. The broken join will pop out from the body. Remove it immediately. Then check the Nendoroid body. If there's any dent, fix it while the PVC is still warm and you're done!
 The broken joint has been removed successfully

It's actually so simple! Heat, make a space, dig the broken joint out, and you're done! Your Nendoroid may become a bit dent, see the area that I mark with (*)! It's only a small dent so no one will notice it. Many people say that heating PVC will make it melt. It's true, so my advice is use your feeling when doing this. If you feel it soft enough, stop heating it and slowly make the space ^^

The end result, you'll get the stuck joint out and a bigger hole in the Nendoroid body so a joint won't get stuck again XD

And by the way, I also got some other way to remove broken joint from my friends in Facebook!

Charlie Anthony (animaster)
  • Use a tweezers to take it out or,
  • Use a pin vice or,
  • Pierce the join with a needle then pull it out or,
  • Soak the Nendoroid body with warm/hot water (to soften the PVC) then pierce it with needle or a pair of compasses, after the needle is in the joint (about 1-2cm) then slowly pull it out.
Ren-san (from rendoroid shoppe)
  • Drill it using a small drill (very small drill, to be exact) or,
  • Pierce it with a pair of compasses or,
  • Glue and rejoin it with the other part of broken joint (I suggest with super glue, or glue for metal) then try to pull it out again.
Rachmat J. Greywinds
  • Make a small hole (0,1-0,2mm, made with pin vice) in the stuck joint, then place a needle (or small iron rod for more strength) that has been covered in Alteco (a kind of glue) inside the hole. After the Alteco is completely dry and hard, pull it.
Billy Goetomo
  • Use a small screwdriver to drill the stuck joint, after the screwdriver is inside the joint, pull it slowly.
Also try the method from Mikatan! Click here to read it! You can also find out how to connect the broken joint there ^^

For those who are facing this problem, you can try the methods above before you try mine. But if you don't have the equipments (like me, Alteco and pin vice are kinda hard to find near my house), you can try my method ^^

I use the hair dryer because I don't have the proper equipment and I'm too weak to pull the joint! It's hard to pull it with a needle. I got a dent needle instead of removing the stuck joint. I also failed to pull it with a tweezers T_T

End words,
Huge thanks for all who gave me many advices to fix the problem! I won't get the idea to use hair dryer without advices from you all! >.<

Tuesday, May 17, 2011

Comparison: Bootleg Miku vs. Genuine Miku

 Like I ever wrote in my post, there is a new bootleg of Nendoroid Hatsune Miku. And now animaster, the owner and founder of Nendonesia has already posted the review on Nendonesia site. As I already mentioned in my previous post, you should be more careful when purchasing Nendoroid. This bootleg has an improvement on the eye stamps.

You can see now the eyes direction are correct.

Well, for the full review, do a visit to Nendonesia site: Bootleg vs Genuine: Nendoroid Hatsune Miku ^^
Hope that post will help you a lot!

Credit photo: animaster & Greywind

Wednesday, April 20, 2011

Beware of New Fake Nendoroid Hatsune Miku!

A friend of mine, Rachmat-san just bought a fake Nendoroid Hatsune Miku, he wants to make a custom Nendoroid from it. This often happens if you wanna make a custom one but you're not very sure to make it from a real Nendoroid. Besides, since Miku is very popular, her Nendoroid is being sold at a very high (and crazy) price in Indonesia Q_Q

Back, to the fake Nendoroid. Rachmat-san showed us the picture and he told us that the one he bought is a new fake Miku! Pretty surprising, right? Even a counterfeit can make an improvement. He himself said that we have to be more careful when purchasing Nendoroid. Here it is....


Yes, if you already realize, the new improvement is on the eyes. Her eyes direction is now correct. Take a look at the old one, it has a wrong direction:


Now, let's take a closer look to the new one:

 Her face plates are still glossy. Rachmat-san used flash in this photo so it's kinda difficult to see if the skin is still sunburned or not ^^;

It still has a rough finishing, look at Miku's hairpin. The pink line on it is oblique.

For further details about this fake Nendoroid, we are still waiting for a review from Charlie Anthony ^^
Photo credit goes to Rachmat J Greywinds, thanks for allowing me to use your photo on my blog and good luck with your custom Nendoroid! ^^v

Monday, April 11, 2011

Be Careful of Fake Nendoroid!

As a collector, I'm sure you want the real ones right?

Today I wanna blog about how to avoid purchasing a counterfeit, bootleg, or fake Nendoroid. The figurines industry is booming right now so no wonder there are so many counterfeits in the market. I myself ever bought fake Nendoroid Petit from a campus event, don't let this happen to you!

Since I'm also a newbie in collecting Nendoroid and other figurines, I'll write this based on what I already saw in some events and Internet reviews, pictures are taken from Good Smile Company website. Click the link if you wanna see that (in Japanese).

Now let's start it!

First, if you go to an event and want to buy Nendoroid, please consider these things:

1. The Box
Take a deep look in the box! How's the print color and look at the details. Counterfeit often has some missing details and the paint was done badly, the color of the box is often reddish and darker from the real one.

 The real Yuki Miku has an embossed snowflakes (right), while the counterfeit one (left) doesn't.

 The counterfeit (right) has a poor box color.

Missing sticker.

The real one on left: (c), the fake one: only c.

If you can, take a look at the "Nendoroid" inside the box, in the fake one the writings are upside down and poor printed, just like this:

On left, the real one.

2. The Nendoroid
Now take a look on the thing. The fake is painted glossy while the real one isn't. The fake ones often have wrong expression and bad finishing. It's easy to tell the differences, take a look:

 This Miku looks good enough for you?
The fake (right) has wrong expressions (the mouth is open), a glossy face, different eyes shape, and her skin looks like she got sunburn.

 On left, the real one. See the difference?

 Left: fake, right: real.
The fake's tie doesn't have gradation, her face is glossy, and she has different eyes shape from the real one.

The fake one has larger eyes and glossy face.

Left: real, right: fake. Rough finishing, glossy face, wrong color and messed hair.

3. The Price
Fake Nendoroid is often sold at a very low price, it's about $8-15 (about IDR 80.000~150.000 or 800~1500 yen). The normal price is 3000~3500 yen or about $30~35 or IDR 300.000~350.000, even some store sell Nendoroid at higher price because the shipping cost and rarity of the figure. If you find the one that is too cheap, it's probably a fake one. I ever bought fake Nendoroid because of this and I regretted that. Don't be tempted by cheap price, you'll regret it. Use your logic, there's no way in hell a seller would sell a figure below its retail price.

That's the differences from what I saw and searched. Here's some tips to buy a Nendoroid:

1. Make sure you know the details of the item you'll be buying. Pay attention to the box and the Nendoroid details.
2. Beware of low price.
3. If you're not sure, don't be shy to ask the seller. As a customer, you have the rights to know the details of his/her products.
4. Only purchase Nendoroid and other figurines from a trusted seller, especially when you buy it online. Read the buyer's comments and see the seller's history, how long he/she's been selling figures, how is the product, any detail is important. And be careful because some sellers could be lying to you by showing you the real one and then sending you a counterfeit.
5. If you already feel something weird when you see the figure, you better don't buy it.

Then how if you already bought one and you worry that it's a fake one? There's a quick way to tell whether a Nendoroid is a fake or not. Just look at the base stand and see what's written on it. The real Nendoroid stand has copyright and "MADE IN CHINA" but on the fake one, it's only "MADE IN CHINA"....

Left: fake, right: real. See?

That's all for today! If you have any suggestions or additional information, it will be very helping! Leave a comment if you do have some information and suggestion! ^^
I hope this post will help and I'm sorry for my poor English T_T

Wednesday, December 29, 2010

How to Change Blogger Icon

Just a few minutes ago, I just change my blog icon, from the standard one into the one I want =)

Since I just did it, I'll share it! But this is for Blogger user only, because I only know how to change the icon on Blogger.

First, you need an image. The simplest way is upload your image on ImageShack: http://imageshack.us/
It would be better if you resize your picture into thumbnail size


After you uploaded it, the image will appear, click "view full size" and you'll see this:


Now, go to your blog dashboard. Choose "Design" and then click "Edit HTML". This will appear on your screen:


Search this in the HTML box
To find it, use CTRL+F. And then this is what you'll see:


After you found it, type this above it. Zoom the image above for bigger image.


The result is like the picture above. After that, click "Save Template" and go see your blog for result, or if you're not very sure, you can click "Preview" first.

Sorry for my bad English and happy trying ^^
Hope this post could help!

Note: I don't know why but the new icon doesn't appear in Opera Mini and Google Chrome T_T

Tuesday, December 28, 2010

How to Convert Video to MP3 with Nico Sound

Nah, this often happens. You found a nice video in Nico Nico Douga but too bad, you couldn't find any mp3 of it although you've searched in Google, 4shared, or other download site and search engine. If that happens, you actually can convert the video in Nico Sound ^^

First, go to Nico Sound: http://nicosound.anyap.info/index.aspx
The site is like this:


Now just paste the video URL in the box which I marked by red circle, then click the button besides the box.
It will appear like this:


Scroll down a bit... You'll see this:


Click the button I've marked with red circle. "MP3" is written on it. After you clicked it, a dialogue box will appear.


Click OK, then your download will start soon =)

Hope this will help ^^
Once again, sorry for my bad English! >.<

How to Embed Video from Nico Nico Douga

This afternoon, after many fails, I finally could embed video from Nico Nico Douga, a video sharing site from Japan (it's like YouTube). Since they have updated their site to ver.9, now we can embed video from there. And since I failed so many times, I just want to share how to embed the video on your blog or site =)

First, of course we have to open the site and the video


If your Internet connection speed isn't very fast, you'll have to wait until the video appears. Then it will look like this:


Just ignore the advertisement, you can close it by clicking the x sign. Now scroll down a bit, and you will find a button under the video. I marked it with red circle ^^

Click it, then another tab will open like this:


What I marked with red circle is a HTML code to embed the video. Just copy and paste it on you blog and the video will appears ^^

While what I underlined with yellow line is a code to make this:


And I have to note that not all blog service could embed video from Nico Nico Douga, so if the HTML code didn't work, maybe your blog don't allowed embed video from Nico Nico.

That's all from me, sorry for my bad English. I just hope this will help ^^